I was reading a blog, and someone post this video about a CM advertising windows 1.0. Is this real? I couldn't believe when I saw it.
Only $99!! LOL!! It looks like TV shopping!!
Check it with your very own eyes:
Tuesday, May 26, 2009
Agressive advertising!!
Posted by
Kaja
at
Tuesday, May 26, 2009
0
comments
![]()
Labels: advertise, Microsoft, Steve Balmer, windows 1.0
Friday, May 8, 2009
Double Windows, Same User Path
When you install a lot of stuff in the windows this became a little slow (Really SLOW) and what is the better think to do? Format and install from zero.
BUT the windows have limitations on the activation key (Like I buy a car and when I need change some pieces, I need get permission of authorized to do something with already is ours), I had a lot of disappointment about windows, but i need to see the new games enter in the market and programming, for this reason (activation key) I found another way to stay with a original windows: Make a image.
Here i have a problem. When I recover the image, all my settings is lost.
So I decide make one partition to games and other to programming, but have other problem. I have program who like to use in both parts, so more one partition to put my stuff.
With the release of Windows 7 RC I decided check and make this tutorial for the people who like continue working with your computer while having time to leisure.
The first step is create a partition. You can user the Partition Magic or other freeware. You can check The Free Country. I not teach this part because I already have have a two partition and just resize one of. My HD is 320GB divided in order (70GB, 180GB, 70GB) all primary, formatted with NTFS. This is important when you will change the active partition.
Make sure you set the 3th partition to install the windows. After install the windows when you insert a name of user, put anyone, because after we will discard (Don't install any program. Is this part we start the settings).
To change the register I use the freeware program, is very fast to make the changes, so if you like you can download the Registrar Registry Manager. After all make a backup of register with this program (File->Backup and Restore) if you make some mistake, you can restore the original file.
Make a look if the windows make this settings in the HD:
- Administrative Tools->Computer Management
Is very important the common data stay in the middle and the drive name with E:. If is not, in the same program you can change: click with right button in the drive and select "Change drive letter and paths ...".
Starting
I decide create the users path in the E:\Data\Users\ because all the information in the "Data" directory is used to put document, settings, etc.
In the Windows Explorer:
Make a copy of "Default" and "Public" directory in "C:\Users\" to "E:\Data\Users\"
In the Registrar Registry Manager:
Click in Search->Search registry (Ctrl+F). In "What to look for" Leave only "Data" checked
Search to a "\Public" text and the result will come the following information below:
Make a new seach with "C:\Users\Public", select all (Ctrl+A), Right Button->Replace.


Change to the new directory:
Now we can create a new account with administrator that will use to login in the new directory.
Restart the windows and select the new account (Don't use logoff).
Wait the windows create a new profile and check the directory if the user already created in the new directory.
Now you can copy the old user to the new directory
Enter again in the "Registrar Registry Manager" and change the others "C:\Users\" directory to
Restart again the windows and enter the older user.
This time you can change all the "C:\Users" to a new directory
Restart again the windows and select any user you like.
I advice delete the old User, because as you made a copy of the original with the new user, the new user become owner of the file, so if you want to keep the old User, you need make this changes. (Hint: when the file was copied, the read-only attribute was also copied with the new user as a owner, so when you try use some features like download, will can't save).
With all basic installation, now we create the image (I will use the Norton Ghost or a interesting program called Hiren's, which contains a excellent programs for the computer configuration).
My first experience with Norton I lost all my data because I didn't know how to make the image, for this reason I took photos step by step to follow.
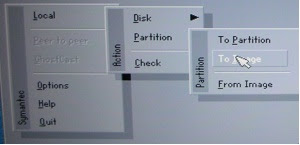 In the norton: Local->Partition->To Image
 Select the HD (I used a external HD to boot, for this reason show two equals HD's)
 Select the 3th partition (Assuming you installed the windows and set in the third partition).
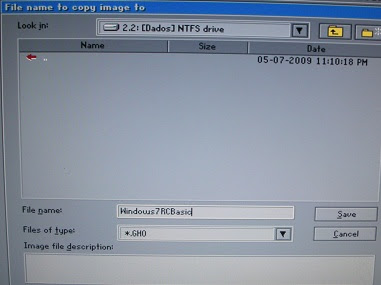 Select where you put the image (I choice the 2.2 is means drive 2, partition 2 - because the drive 1 is my boot HD and the partition 2 is my data storage)
 Choose the compression (For me is Fast)
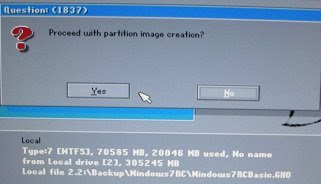 Check the information below the message and you are sure that this right, click in Yes.
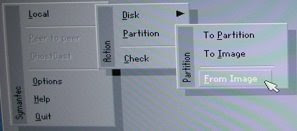 In the norton: Local->Partition->From Image
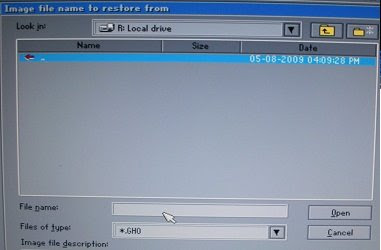 Find the image
 After you select the file will show this message, because in the same file can have many partitions, but we created only one. So select this one and press OK.
 Again, my HD boot, so I'm selected the drive 2.
 I created the image from the part 3, now i will insert the image in the part 1.
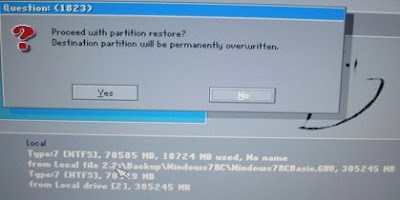 Check the information below the message and you are sure that this right, click in Yes.
NOTES:
- I am not responsible for ANY DAMAGE incurred from the misuse of this material or instructions contained here. Make at your own risk.
- Don't have a boot menu choice because we install the equal image an the MBR make crazy (If you see in the partition magic the information came Error #110). To change the partition you need use the Computer Management (Administrative Tools->Computer Management), select the drive you like change and in the right click select "Make partition as Active). The good part is that you just change to another partition if you want.
When you like recover again the image, first update the windows and all the softwares you installed and create a new image again.
Have fun!
Posted by
Fabiano Ozahata
at
Friday, May 08, 2009
0
comments
![]()
Sunday, April 26, 2009
OOP Gotchas...
I was reading a book, "Learning Python", from Mark Lutz, and although a different topic from usual projects at work, I found one particular comment pretty interesting, and serve all languages in general, IMHO:
I once worked in a C++ shop with thousands of classes (some machine-generated), and up to 15 levels of inheritance. Deciphering method calls in a such complex system was often a monumental task: multiple classes had to be consulted for even the most basic operations. In fact, the logic of the system was so deeply wrapped that understanding a piece of code in some cases required days of wading through related files.Nice words to remind us of the KISS principle.
The most general rule of thumb of Python programming applies here, too: don't make things complicated unless they truly must be. Wrapping your code in multiples layers of classes to the point of incomprehensibility is always a bad idea. Abstraction is the basis of polymorphism and encapsulation, and it can be a very effective tool when used well. However, you'll simplify debugging and aid maintainability if you make you class interfaces intuitive, avoid making your code overly abstract, and keep your class hierarchies short and flat unless there is a good reason to do otherwise.

Posted by
Unknown
at
Sunday, April 26, 2009
0
comments
![]()
Labels: abstraction, inheritance, programming
Thursday, April 23, 2009
MySql... what future expects
After the bombastic news of database giant Oracle purchasing Sun, the open source community was shaken up to the obscure future of the MySQL. Reading the opinion of its creator, Michael Widenius, things do not look like promising to the community. Check out his blog Monty Says: To be (free) or not to be (free)
Posted by
Unknown
at
Thursday, April 23, 2009
0
comments
![]()
Saturday, April 18, 2009
Databases: fixing the legacy dirts
We were brainstorming a little bit on how to solve some of the most common issues every company faces, specially those with rapid growth jumping from small to medium business. The thing is, most of the tables and structure are, in terms of modeling, really dirty, with full of duplication, wrong indexing, crappy namings, etc.
One optimum solution would be to simply re-model the system. Wow, that is easy to say. I wish it was that easy to implement. Thinking on a simple billing table that is used for basically everything on a company, changing it would mean changing all reports, all interfaces, all behind-the-scene processes, applications, etc. Ok, too much work, in deed.
What if we could create a new model and at the same time use the legacy just pointing to this new model? Like a view or something... We could implement a new table or tables to serve the purpose of this specific legacy table, and leave a view with the same signature (names, columns, etc) that would work transparently for the rest of the legacy system.
If you are just talking about a single table, that's not actually so hard thing to do, but re-modeling and putting order to the mess usually means more than that. The problem we need to solve then is: how to create this view that would behave just like the work as if the table was there, but pointing to a better modeled environment?
Searching a bit, we found an interesting approach to that solution, which is to trick the insert/update triggers of the view:
-- Create a sample table A
CREATE TABLE tableNameA
(
   tableNameId int PRIMARY KEY,
   valueA  varchar(10)
)

-- Create a sample table B
CREATE TABLE tableNameB
(
   tableNameId int PRIMARY KEY,
   valueB  varchar(10)
)
GO

-- Create a view which looks to both tables A and B (join)
CREATE VIEW tableName
AS
   SELECT
       coalesce(tableNameA.tableNameId, tableNameB.tableNameId) AS tableNameId,
       tableNameA.valueA,
       tableNameB.valueB
   FROM  tableNameA
   FULL OUTER JOIN tableNameB
   ON tableNameA.tableNameId = tableNameB.tableNameId
GO

-- Create the trigger that will enable the trick to insert in both tables separately
CREATE TRIGGER tableName_insteadOFInsert
ON tableName
INSTEAD OF INSERT
AS
   BEGIN
       SET NOCOUNT ON

       INSERT INTO tableNameA(tableNameId,valueA)
       SELECT tableNameId, valueA
       FROM inserted
       WHERE valueA IS NOT null

       INSERT INTO tableNameB(tableNameId,valueB)
       SELECT tableNameId, valueB
       FROM inserted
       WHERE valueB IS NOT null
   END
GO

-- Create the trigger that will enable the trick to update both tables separately
CREATE TRIGGER tableName_insteadOFUpdate
ON tableName
INSTEAD OF UPDATE
AS
   BEGIN
       SET NOCOUNT ON

       UPDATE tableNameA
       SET valueA = ( SELECT valueA FROM inserted )
       WHERE tableNameId = ( SELECT tableNameId FROM inserted )

       UPDATE tableNameB
       SET valueB = ( SELECT valueB FROM inserted )
       WHERE tableNameId = ( SELECT tableNameId FROM inserted )
   END
GO

-- Done!

-- Testing...

-- Insert some data into the tables A and B thru the view
INSERT INTO tableName(tableNameId, valueA, valueB) VALUES (1, NULL, '10')
INSERT INTO tableName(tableNameId, valueA, valueB) VALUES (2, '20', '20')
INSERT INTO tableName(tableNameId, valueA, valueB) VALUES (3, '30', NULL)
GO

-- Displaying the results on screen
SELECT * FROM tableName
GO

-- Update some data of the tables A and B thru the view
UPDATE tableName SET valueA=100, valueB = null WHERE tableNameId = 2
GO

-- Displaying the results on screen
SELECT * FROM tableName
GO

-- Just clean up this mess!
DROP TABLE tableNameA
DROP TABLE tableNameB
DROP TABLE tableName
GO

-- Cool, isn't it? (EOF)


If you try to insert directly into the view without adding the InsteadOf triggers, this is the error SQL-Server will return to you
Server: Msg 4406, Level 16, State 1, Line 1
Update or insert of view or function 'tableName' failed because it contains a derived or constant field.
Source:
And here is the result of this example:

(result of the inserts)

tableNameId valueA     valueB
----------- ---------- ----------
1           NULL       10
2           20         20
3           30         NULL

(result of the update on id=2)

tableNameId valueA     valueB
----------- ---------- ----------
1           NULL       10
2           100        NULL
3           30         NULL
[MSDN]: INSTEAD OF INSERT Triggers
[MSDN]: INSTEAD OF UPDATE Triggers
Posted by
Unknown
at
Saturday, April 18, 2009
2
comments
![]()
Labels: legacy, sql, sql-server
Wednesday, April 15, 2009
What can we learn about usability…
Posted by
Fabiano Ozahata
at
Wednesday, April 15, 2009
0
comments
![]()
Tuesday, April 14, 2009
Computer Science without computer? It's possible???
This is a proposal of the site Computer Science Unplugged with a series of computer knowledge to make without computer such as binary numbers, algorithms and data compression through games and puzzles that use cards, string, crayons and lots of running around.
It is easy and very fun.
Posted by
Fabiano Ozahata
at
Tuesday, April 14, 2009
1 comments
![]()
Monday, April 6, 2009
L10n?
I first saw this terminology in SplendidCRM code, and did not quite understand why they had it with that name, and just learned how to use it. Today, I was watching a Django video, when the guy presented the following item in the slide:
- i18n / L10n
Funny way to write long words...
Source: http://en.wikipedia.org/wiki/Internationalization_and_localization
Posted by
Unknown
at
Monday, April 06, 2009
3
comments
![]()
Labels: curiosities, general
Friday, April 3, 2009
Online meeting - Desktop Sharing App
 I needed to do desktop sharing with one of my friend, and was looking into several desktop sharing / online meeting apps which are FREE. And I found a very good application that is quite simple and easy to setup, and this is my choice. It called Mikogo (http://www.mikogo.com).
It can by pass firewall and you don't need any static IP and it is very easy to setup a meeting.
You can have online meeting with multiple users. It allows the meeting attendees to switch to become presenter, or even the take control of the presenting computer. Oh, only one computer can be a presenter at a time. Another feature that I like, that you can choose which application that can be shared. So, you can keep all the running apps in background while you are in the meeting and not worrying that the other may peek at your mess desktop :)
The lacking is, it does not have chat, voice or video yet. Even so, I don't see that as a big problem. I just combine it with Gmail Video chat and the problem solved. I am afraid if it has the video chat, the desktop sharing will get slower, since currently I am very happy with the response time.
Take a look if you have time.
Posted by
Teguh Eko Budiarto
at
Friday, April 03, 2009
6
comments
![]()
Tuesday, March 31, 2009
skype on iPhone
Skype released an iPhone version...
Does anybody have used it already?
More details in wired
Posted by
Kaja
at
Tuesday, March 31, 2009
1 comments
![]()


